Parcel Search
(This search option allows
users to search IDIS for any information associated with a parcel. There are three ways of searching for a
parcel in IDIS: By Address, By Legal Description or By Assessor Number)
How to do a Parcel Search by Address
(This option allows the user to search IDIS for all documents associated with a parcel by using an address as the main search criteria)
- From the IDIS Home Page choose Parcel Search. Please see the screen below.
2. Choose ‘By Address’ as shown below.
3. Enter: Beg# (e.g. 201) and Street Name
(e.g. Figueroa - not case sensitive) as shown below. The Beg# and Street Name fields must be
filled before a user can proceed with the search. Other fields like ‘Beg Frac’ may be used but are optional.
The user can then click on the Next button to continue with the
search. To clear the fields and make a
new entry, please click on the Clear button.
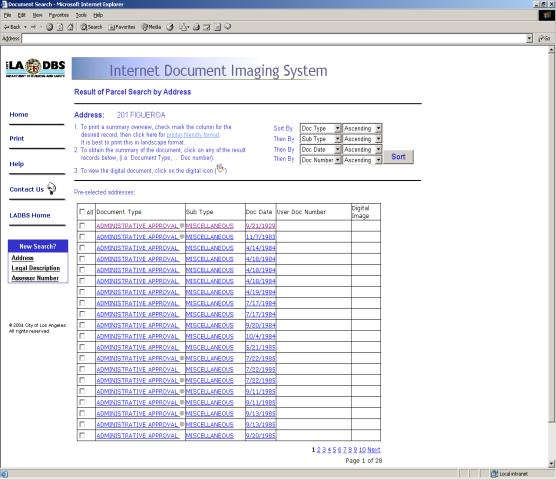
5. If the search criteria provided by the user is sufficient to select a specific parcel, the application will display an intermediate screen similar to the one shown below. Since a parcel could have multiple addresses, legal descriptions, and assessor numbers, the user is given the option to select the desired information they are looking for. Putting a check mark before the address, legal description and/or assessor number associated with the parcel will help the user locate the specific information that they want to see. Please make your selection(s) and then click on the Continue button to proceed with the search.
a. Rearrange the order of results by document type, document subtype, document date and/or document number by using the sort feature. This will allow the user to view the results in the order that the user want (sort feature). Please click here for more instructions.
b. View and print the Document Report by clicking on the actual record. The Document Report provides detailed information on the document record selected. Please click here for more instructions.
c. View
and print Digital Image(s) associated with the record by clicking on the
digital image icon (![]() ). The digital
image(s) are the scanned document(s).
The user can view a digital image if they have read access to that
image. Please click here for more instructions.
). The digital
image(s) are the scanned document(s).
The user can view a digital image if they have read access to that
image. Please click here for more instructions.
d. View and print the summary of record(s). This will give users an overview of the documents that were selected by putting a check mark beside the box placed before each record. Please click here for more instructions.
e.
View the comments for the record by pointing the cursor on the
comments icon (![]() ).
).
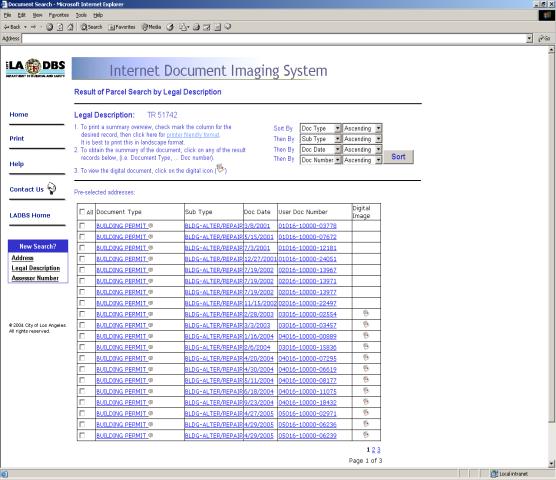
How to do a Parcel Search by Legal Description
(This option allows the user to search IDIS for all documents associated with a parcel by using the legal description as the main search criteria. The information could be entered in the tract or map ref field)
- From the IDIS Home Page choose Parcel Search. Please see the screen below.

2. Choose ‘By Legal Description’ as shown below.
3. Enter the Tract or Map Ref. These search fields are not case sensitive. The Tract or Map Ref fields must be filled before a user can proceed with the search. In the example below, the Tract was used. The user can then click on the Next button to continue with the search. To clear the fields and make a new entry, please click on the Clear button.
5. Once the user clicks on the continue button (from the intermediate screen of the parcel search by legal description) the user will get a result screen similar to the one shown below. From the result screen, the user will be able to do the items listed below:
a. Rearrange the order of results by document type, document subtype, document date and/or document number by using the sort feature. This will allow the user to view the results in the order that the user want (sort feature). Please click here for more instructions.
b. View and print the Document Report by clicking on the actual record. The Document Report provides detailed information on the document record selected. Please click here for more instructions.
c. View and print Digital Image(s) associated
with the record by clicking on the digital image icon (![]() ). The digital
image(s) are the scanned document(s).
The user can view a digital image if they have read access to that
image. Please click here for more instructions.
). The digital
image(s) are the scanned document(s).
The user can view a digital image if they have read access to that
image. Please click here for more instructions.
d. View and print the summary of record(s). This will give users an overview of the documents that were selected by putting a check mark beside the box placed before each record. Please click here for more instructions.
e.
View the comments for the record by pointing the cursor on the
comments icon (![]() ).
).
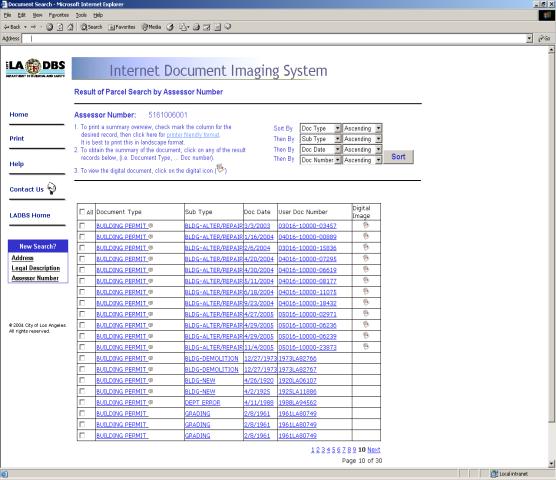
How to do a Parcel Search by Assessor Number
(This option allows the user to search IDIS for all documents associated with a parcel by using an assessor number as the main search criteria)
- From the IDIS Home Page choose Parcel Search. Please see the screen below.

2. Choose ‘By Assessor Number’ as shown below.
3. Enter the Book, Page, and Parcel as shown below. These fields must be filled before a user can proceed with the search. The user can then click on the Next button to continue with the search. To clear the fields and make a new entry, please click on the Clear button.

5. Once the user clicks on the continue button (from the intermediate screen of the parcel search by assessor number) the user will get a result screen similar to the one shown below. From the result screen, the user will be able to do the items listed below:
a. Rearrange the order of results by document type, document subtype, document date and/or document number by using the sort feature. This will allow the user to view the results in the order that the user want (sort feature). Please click here for more instructions.
b. View and print the Document Report by clicking on the actual record. The Document Report provides detailed information on the document record selected. Please click here for more instructions.
c. View and print Digital Image(s) associated
with the record by clicking on the digital image icon (![]() ). The digital
image(s) are the scanned document(s).
The user can view a digital image if they have read access to that
image. Please click here for more instructions.
). The digital
image(s) are the scanned document(s).
The user can view a digital image if they have read access to that
image. Please click here for more instructions.
d. View and print the summary of record(s). This will give users an overview of the documents that were selected by putting a check mark beside the box placed before each record. Please click here for more instructions.
e.
View the comments for the record by pointing the cursor on the
comments icon (![]() ).
).
© Copyright City of Los
Angeles. All rights reserved.